Help
Contents:
- Installation and setup.
- Overview.
- Adding in market string.
- Adding stock string.
- Adding rackets.
- Adding customers.
- Adding jobs.
- Completing jobs.
- Editing.
- Knots.
Installation and setup
- Copy all of the files and folders to the web installation folder on your server. This is normally "public_html" or something very similar.
- Create an empty MySQL database on your server. This is normally done via the cPanel of your web hosting provider. Make a note of the DB name, user and password. Also note the DB server address, this is normally 127.0.0.1 but may be different.
- Open up a web browser and navigate to your domain. The first page you should be greeted with is a database configuration page. Fill in the fields using the details you made a note of in the previous step. If this is the first time using the app tick the box to create the tables and insert sample data.
- When you first start the stringer app you will only be able to view certain pages. All other pages will require you to login before they can be viewed. Select login from the menu. The default login is admin and the password is $Admin001
- Click on the account icon from the main menu. Here you will see your account details. Change the password on the account by clicking reset password.
- Go to settings on the main menu. Set your currency and units to suits your location.
- Next go to settings and check that the reel lengths you have in stock are present in the list. Most have been added, but you may need to add more.
- The admin is a super user. You may wish to add another user that has less privileges. Go to settings "User accounts" to add more users and set the passwords.
- Click settings "Payment account details" These are the bank account details that will be printed on the label. These should reflect the account you wish to get paid into.
- Lastly set your domain name. This should be yourdomian.com and should not have any https prefixes. This ensures the QR code is setup properly on the label once its printed. If you have created sub domains on your hosting site, your domain name must reflect this.
Overview
-
Click on jobs from the main menu and you will see following screen layout.
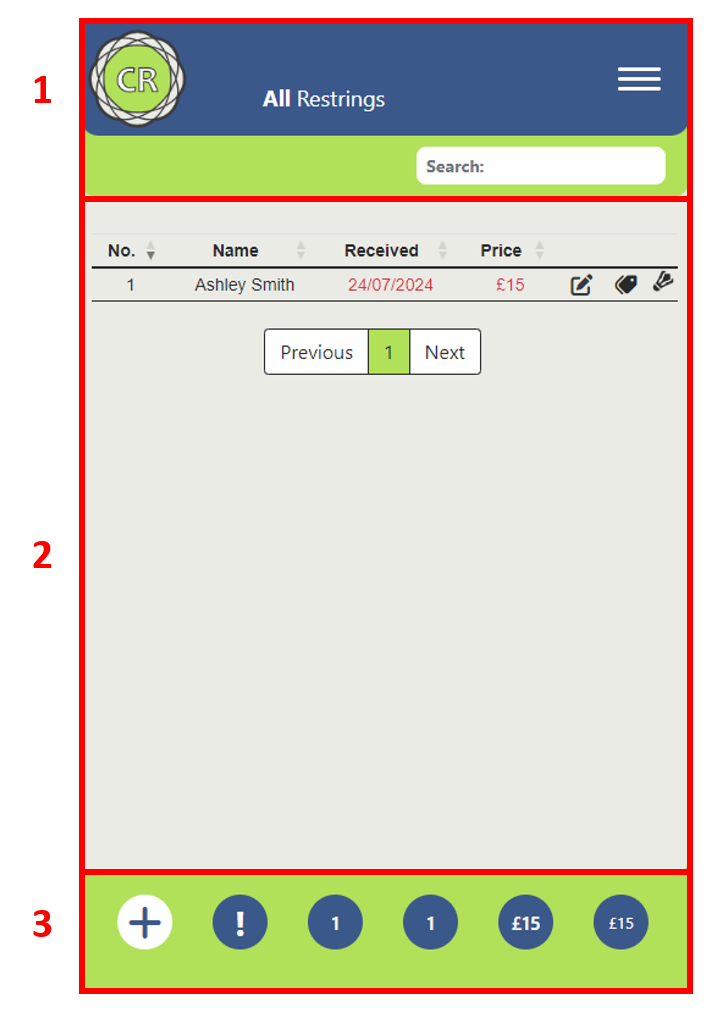 The layout is responsive so will change dependant on screen size. The top bar (1) always has the menu bar. Clicking the logo will always take you back to the homepage. The main part of the page (2) is the content section. The footer section (3) is the information bar.Working from left to right, you will see a plus button (A). The functionality of this button will change depending on what page is loaded. The next button (B) is the warning/information alert. If it is flashing there is a system generated warning message. Click the exclamation mark and either close or clear the message window. Note: The button will continue to flash until you clear the message. The next circle along (C) shows the number of restrings for the current month. The next (D) is the total restings on the system. Next (E)is the amount of money owed. Clicking this will list jobs that still have outstanding payments due. The next (F) is the total amount earned from restrings.
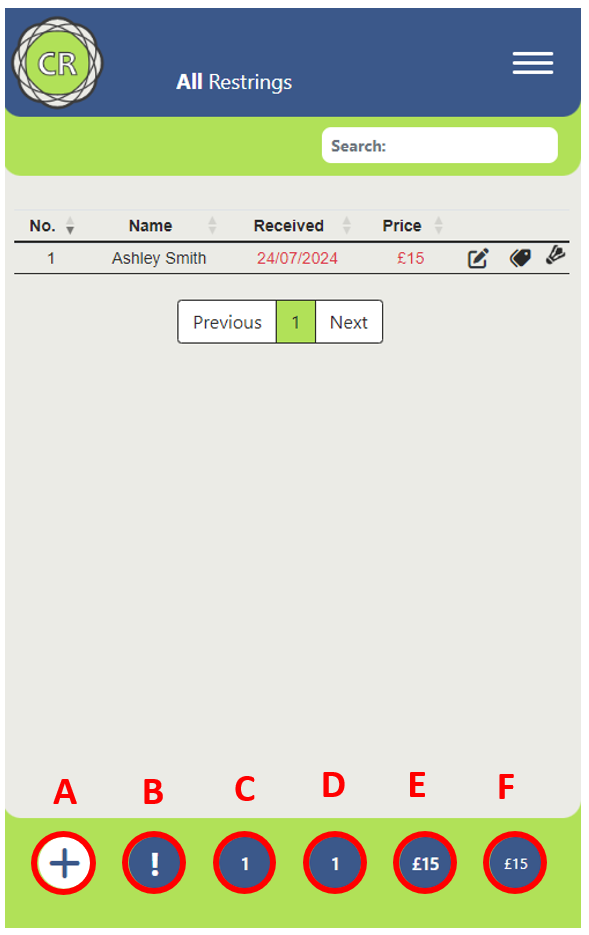
- In order to add jobs into the database you will need to first add your customers, add your stock string and any in market string if needed.
Adding in market string
- The in market string is purely a database of the strings that are readily available in the market. Some have been populated as a starting point, but you will need to add any string you use on a regular basis. Go to settings and click "In market string". Check that the strings you use are listed.
- If you do not see the strings you use, click the plus button in the bottom left. Enter a brand (Yonex, Head, or Wilson for example). Enter a type (BG80, Razor Soft or X-one for example). Select a sport from the dropdown. Add any notes for the string. You may wish to add notes on performance characteristics or gauge.
- Click submit and the string will be added to the database.
Adding stock string
- Select "Stock string" from the main menu. Click the plus button to add a new reel of stock string. This is the string that you have available and ready to use. The first pull down is "Sport". Select the sport you are adding a string reel for.
- A new pulldown menu will now appear called "Base reel". Pull this menu down and select the market string (That you added in the previous section) that represents this reel. If you do not see the string in the list you will need to add a new in-market string. Hit the green plus button next to the pull down.
- Select the purchase price for the reel and how much you want to charge for each restring that uses this reel. Select the reel length from the drop down and the purchase date. Add any notes that relate to this reel. The last option is "Owner supplied" Some individuals may supply you with a reel of string. If this is the case select this option. It will tag the string as being "Owner supplied" You may also want to add a comment in the notes if this is the case to state who owns the string.
- Click submit and the string will be added to the database.
Adding rackets
- This is a list of customer and in market rackets.
- If you do not see the rackets you use, click the plus button in the bottom left. Enter a brand (Yonex, Head, or Wilson for example). Enter a model. Add any notes for the racket. You may wish to add notes on stringing patters or links to stringing patterns.
- Click submit and the racket will be added to the database.
Adding a customer
- This is a list of customers that you string for. You ca set their preferences for tension, pre-tension, string and racket plus add any notes that are relevant to the customer.
- To add a new customer click the plus in the bottom left. Complete all of the information relating to the customer and click submit. Note: Mobile and email are optional.
Adding jobs
- You are now ready to add a new job to the database
- To add a job select jobs from the main menu. The table shows all of the jobs that have been requested. To get more information click on the restring no. This will show all details of the job plus any other jobs that the customer has previously requested.
- The table shows some data in red text. If a racket is still in the queue and has not been delivered to the customer it will show in red. Additionally if a job has not been paid for it will also show in red.
- To add a new job press the plus sign in the bottom left of the page. Select a customer from the dropdown, and then a sport. this should load any preferences that are stored in the customers profile.
- Select which string is required for the main. The default is for the crosses to be the same, but this can be set independently. Once the job is submitted any string selections will automatically be deducted from the stock reels that were selected. If the job is deleted or edited the string selections will be automatically adjusted.
- Use the tension slider to select a tension for mains and crosses. And select a pre-stretch setting if required.
- Select a racket from the pull-down menu. You will also have the option to take a picture of the racket. This will be stored in the database. If your web server has "Imagemagick" installed, the image will automatically be optimised for storage.
- Select the dates that you received the racket and also the date for when the racket is required.
- Lastly select if a grip is required. This will add a grip cost onto the job. The grip cost can be edited in setting. If for whatever reason it is a free restring the box can be ticked. This will set the job cost to zero. Note: if a grip has been selected, this will still be charged. Finally click submit and the job will be added to the list.
Job Completion
- Once the job is complete a label can be printed using the label icon on the table. This will generate a PDF label with all of the job details and a QR code that links back to the customers home page. The PDF can be sent to any standard thermal label printer. Additonally if an invoice is required this can be generated from the viewjob page. The invoice will open as a PDF in an A4 paper size format. It will display all of the jobs for the selected customer that have not been paid for. Once a racket has been delievered back to the customer it can be marked as delivered. Once the job has been paid for it can be marked as "Paid". Both of these options can be found on the edit job page.
Editing a Job
- To edit a job, click the icon on the jobs page. This will open up the edit job page and allow you to edit all aspects of the job. From this page you can mark the job as delievered and paid for.